Monday, December 30, 2013
Christmas Clean up (Recycle, repurpose & reuse)
Friday, December 20, 2013
Wrapping it up for Christmas
I am winding down and wrapping up all the preparations for the holidays. Finally finished decorating the tree, finally finished the Christmas cookies and finally finished decorating. Better late than never! I also managed to finish these two bags for two of my favorite customers! The blue bag is 32" wide and 22 tall, plenty of room to put a very large (folded) quilt!
The second bag is for a new customer who loves brights, it is only a bit smaller, 29 " wide, 21" tall, still very roomy. I was in a bit of a hurry this morning to get to bee and give the ladies their bags, so I didn't take a picture of the interior, they each have a coordinated pocket inside.
I tried several new things this year, which certainly delayed the decorating process. I have collected vintage ornaments from garage sales, flea markets etc., for over 20 years. I have pinned (pinterest) many tutorials on how to make wreathes from the ornaments, but it just seems so permanent I just can't actually make one. Instead, this year I have accepted that they will never be in a wreath and started to think about alternate uses, here are three of my favorites using items that I already had.
I bought the swan at an old antique store (Rainvilles) about 7 summers ago, I have done various things with it, but this is my favorite! (so far)
I just started to change this candle holder seasonally this summer, so I don't have all the candles to go with the decor yet. I sent my DH and DD out to get them and DD came home with these. LOVED them. Well, until we took the plastic cover off. Tahitian Vanilla is overwhelming! My solution was to take out my beloved Mod Podge, yes, I did! DISCLAIMER: Do not use Mod Podge on candles that you intend on lighting some day. DON'T DO IT! FLAMMABLE!! I never light my candles, so this was the perfect solution for me. I brushed Mod Podge all over it and sprinkled glitter over it. It only took two coats and the smell was completely gone. No color is off limits for me now!
Off to link up with Amanda at Crazy Mom Quilts for Finish it up Fridays, then back to the studio to long arm on some fabric for a last minute Christmas request. Happy Quilting!!
Friday, December 13, 2013
Stash Busting for Charity
Friday, December 6, 2013
Scrappy Ornaments
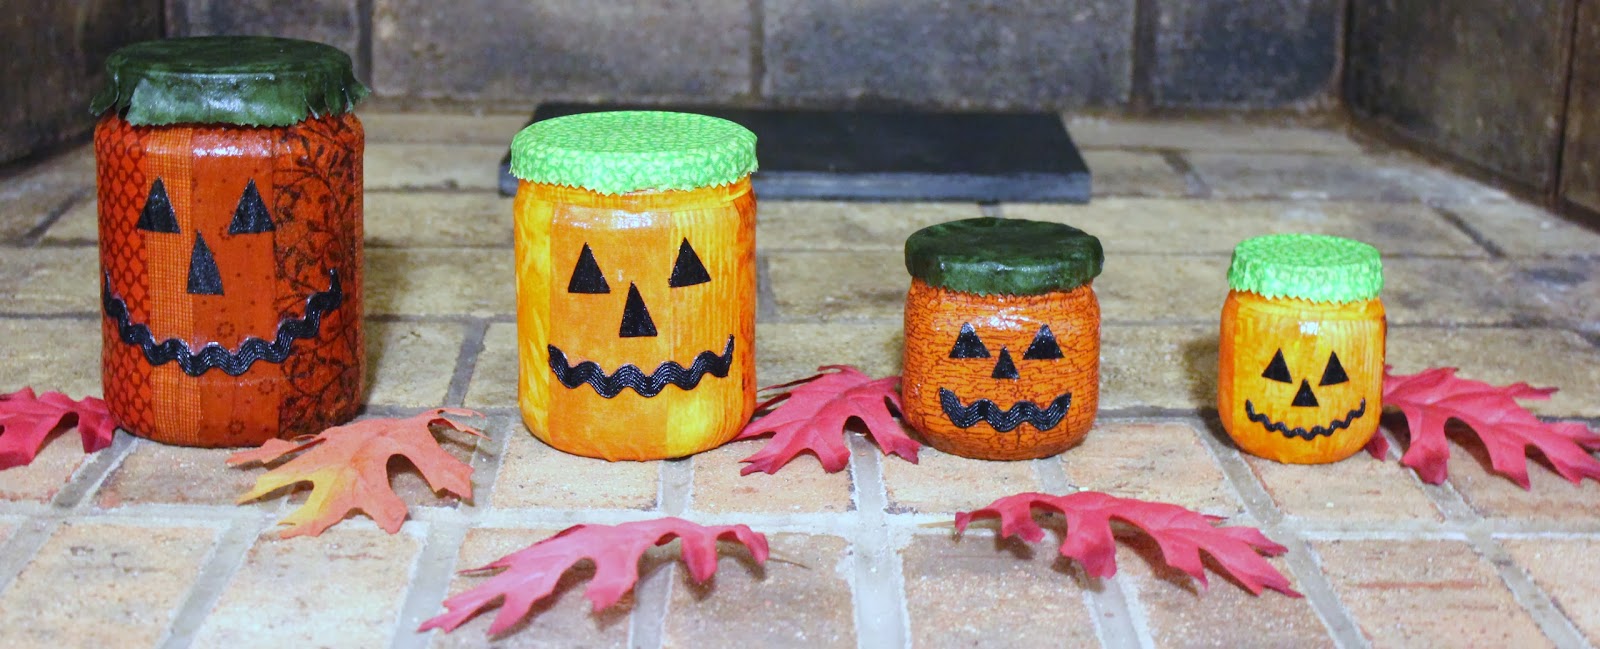
I have found yet another use for scraps! I first thought of this when I was recycling jars into pumpkins via Mod Podging orange fabric strips and scraps. I was in need of a little something as gifts for my fellow bee members for our annual Christmas luncheon. We exchange little ornaments or items usually homemade. So far I seem to be fixated on ornaments. This year I bought the smallest glass balls from Joann's Fabrics and I went through my scraps, which are organized pretty well this year. I chose scraps to suit each of the ladies tastes, i.e., purples, blues, brights, fall colors, reds, citrus etc., I needed 12, and I made 2 extra just in case.
I put clay in the bottom of some candle stick holders, then broke wooden skewers in thirds and made an inverted v and put the hole of the ball on top of it to keep my hands relatively clean as I worked. It also allowed it to dry on all sides. My best advice is to take your time and let the Mod Podge dry a bit as you work. I brushed some on the balls then I organized my fabric pieces. Then I stuck a few pieces on and brushed more Mod Podge over it, then worked on the second ball. It wasn't so slippery and stayed put better that way.
The silver tops were tricky! I found this Styrofoam to stick them in while I worked. HUGE help, it was also nice because it still had a plastic covering over it so it wasn't ruined. You will need sharp little scissors for this part, I also pinked the side that was going on the bottom edge of the top. Definitely use a small brush and brush the Mod Podge on and let it set before trying to wrap the fabric around it. Cut slits for better folding before trying to fold it down.
There they all are! I put extra coats on everything because I wanted them to be really shiny.
I added little name tags and made little hangers out of pinked selvages and trimmings. I was going to use ric rac, but I didn't have a sufficient variety of the tiny ones to match all the different combos.
I really enjoyed making these and I am very happy with the results! The ladies liked them too, and were so surprised I knew their "colors". I am definitely planning on making more, but I think I may try using larger balls for one of my ideas. I made a medium size one using the orange scraps from my jack o lantern project, but I forgot to take a picture. Trust me, the larger balls are much easier than these tiny balls. Then, of course I started getting more ideas, now if I could only get more time to work those ideas out!
Now off to link up with Crazy Mom Quilts and Finish it up Fridays!
Happy Quilting and Crafting!
Friday, November 22, 2013
Flurry of Finishes
Friday, November 8, 2013
Recycling . . . with Scraps!
Happy Quilting !!!
Saturday, October 26, 2013
Finished my 1XMAS on Friday!
Friday, September 27, 2013
Recyled Shower Curtain
Powder Room |
Finishing up my Friday by finishing up the last bit of an extra shower curtain! When we renovated our bathroom, we bought two panels of the shower curtain. One was not enough, but then two panels turned out to be a bit excessive. I cut the second panel to 24 3/4" wide, turned the side under and sewed it down and hung it along side the other shower curtain panel. I then used a good portion of the remainder to make the curtains at right. Very simple and plain, but DONE. Months passed and I saw the toilet paper holder on pinterest and then figured out my version and made two of them, one for my bathroom and one for the powder room downstairs. Very cute and worked for two different holders, (does not work for my children's bathroom). Finally, in an effort to be able to finish up the last bit of fabric, I trimmed a bath towel and two hand towels, made a tissue box cover and made a cover for a can of mixed nuts to put my peak flow meter and asthma thingy in. YES! Very pleased with the results, and even more pleased that I could just throw away the last little scraps with no remorse! Happy Quilting, and Happy Finishes!
Friday, September 13, 2013
Crayola Challenge
My Finish it up Friday this week was completed early this morning as I finished the binding and ironed on the velcro for my challenge project. Just in time to bring to Guild to display along with the other entries for the Crayola Quilt Challenge! The challenge was interesting, we selected 3 crayons from a bag; If we didn't like one, we could put it back and pick another that we would have to keep. We would have to use all three colors, and we also could use one neutral color, black, white or beige/tan. The quilt couldn't be any larger than 56" X 56". The crayons I drew were Indigo, Cerise and Outrageous Orange!
I took my swatch of colors everywhere, even on my trip to Massachusetts where I selected the Cerise fabric that also had orange and black in it. I found an indigo fabric and a batik orange that I thought was outrageous, but once home found that in natural light it wasn't really exactly the color, but thought it would do. But what to do? My first idea involved making a specific block that would have buttons sewed on, and I was going to melt the selected crayons and fashion buttons from the melted wax! I bought a box of 96 crayons that had two of the colors, cerise and indigo, and started looking for outrageous orange everywhere. I felt criminal, opening boxes of crayons in stores and pulling up the orange ones to read the colors! Finally, it dawned on me to go online to the Crayola website and they listed outrageous orange as being sold in 72 count boxes only. I saw 8, 16, 24, 64, 96 and 120 count boxes, never a 72 count box. There went that idea. So last minute (of course) this idea popped in my head, and with no pattern, a few mistakes and several lessons learned I made a Tri-folding Coloring Tote! I love the velcro, but I think I might like straps next time around, and also it isn't fully loaded with crayons in these pictures as I was trying to keep with the color scheme! The large pocket was intentionally made loose to accomodate a coloring book and the left side is for pencils and odds and ends. I also believe that I am going to gift this to a little someone for Christmas! It was fun to make! Happy Quilting!
Friday, August 23, 2013
Finish it up Friday with some Scrap Love
Have you ever bought a group of fabrics that you just love? Fabric you love so much, that when you start cutting it up for a pattern, you save just about every square inch of the scraps? Fabric that you keep all together, scraps, strips, small and large pieces, long after the original project is done? Yeah, me too. These two hearts were created out of such scraps. Every member of my Guild is making a 12 inch block for a huge Quilts of Valor project. I figured I would make a Star of Hope block and use fabrics that I had used to make a Quilt of Valor from last year. Once I took out the fabrics, there were only a few large pieces of fabric and those were the lighter fabrics. I didn't have enough of one blue or one red to make the Star of Hope block.
Naturally, I had the fabrics spread out and I had a handful of squares and rectangles which I had set down on lighter fabric and they looked very nice so I started playing with them and this is what I came up with! I liked the first one so much that I made another one for me and used 2 1/4" blocks to go around. I sewed a 1 1/2" strip of dark blue all around and quilted it with the regular sewing machine, not only was I in too much of a hurry to do a regular binding, but I am trying to conserve the dark blue as I don't have much left. The blocks were 2 1/4 instead of 2 1/2 because that was the size of strips that were left over from the original project. It was fun to make and gave me a lot of ideas for other scraps that I love! I would love to do an entire quilt like this and I just might! Happy Quilting!!
Sunday, August 18, 2013
Chevron Love
We are expecting a new little girl in the family this fall, so I was very excited to make her a quilt! I wanted to try zig zags with white and I had pinned some choices on pinterest. My niece chose one very similar to this one. More chevron than zig zag and I love the mixture of different fabrics in each row. I was so happy to find everything I needed at my local QS, Nancy's Calicos! I pulled the colors from many different lines of fabric, Nancy's Calico recently added a modern quilt section, and all of the fabrics came from that section. The link on pinterest didn't offer any information about the quilt, who designed it or where to get the pattern. So I figured it out the best I could, I think I made my blocks (accidentally) 1/2" smaller than the quilt on pinterest, but it still turned out a nice size. I also made 14 burp cloths from the same fabric using dimensions that my niece sent me. She had wanted me to use towels as the
backing, but I couldn't find any in the right color or that didn't pull easily. I used very soft and fluffy fabrics from JoAnnes. My long arm finally returned repaired after 9 1/2 weeks, so I was a bit rusty quilting, especially the straight lines. All in all, I like the designs of the quilting and overall, I LOVE the quilt! Happy Quilting!!
Subscribe to:
Posts (Atom)